

How Do You Make A Stop Motion Animation Look More Smooth Fluid Photoshop
While animation in Photoshop is not a new concept, information technology definitely has come a long way in the final few years: The Timeline console has been overhauled, video layers have been introduced, as has the ability to create keyframe animation. These additions have really upped Photoshop's game.
Fifty-fifty though Photoshop is still a long way off from being able to create the high-end and cinematic animations of such programs equally Later Effects, it withal has enough power to create circuitous animation — which is especially useful if you don't desire to spend fourth dimension learning a new application.
In this commodity, I will share several avant-garde techniques to help you create complex animations. We'll look at the Timeline panel and the dissimilar properties that can be blithe. We'll also explore the roles that aligning layers, filters and smart objects can accept in animation (and how to combine all three for some amazing furnishings). Because the topics and techniques in this article are advanced, a moderate level of Photoshop knowledge is expected.
Farther Reading on SmashingMag:
- Functional Animation In UX Design
- Free Photoshop Tools For Web Designers
- A Better Way To Blueprint For Retina In Photoshop
- Applied Techniques On Designing Animation
More than after jump! Continue reading below ↓
Overview Of Timeline Panel
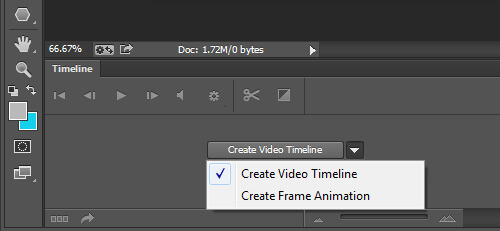
Opening the Timeline panel ("Window" → "Timeline") allows you lot to select between ii types of timelines: video and frame. The frame timeline is for frame-by-frame animation and can exist very limiting. It mostly works past converting the layers in your Layers console to individual frames. I won't go into any more detail on this timeline; I desire to focus on the video timeline.
Video Timeline
The video timeline allows for keyframe animation — which is an animation process in which you lot ascertain primal points of blitheness forth a timeline and Photoshop will translate the in-betwixt frames to create a cohesive blitheness. Let's become ahead and create a very simple blitheness to run into how this works.
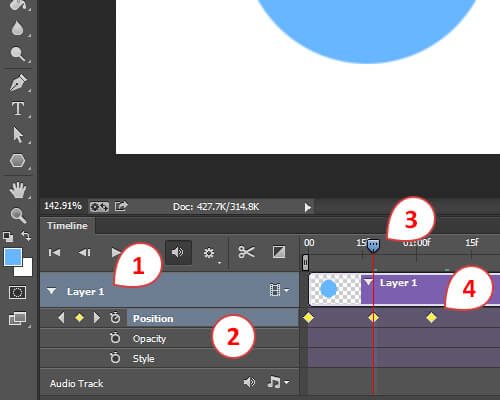
As you probably noticed from the image above, the video timeline shows a representation of layers in the Layers console. Each layer in the timeline has a dropdown panel that exposes the layer properties (these are the properties that can be animated). To breathing a layer holding, simply click the stopwatch icon, which enables keyframe animation. Observe that a keyframe is automatically placed at the current time indicator.
Motility the current time indicator to another point in the timeline and reposition the layer. Again, another keyframe will automatically exist added to the timeline.
Playing back the animation shows how the object on the sail moves from one position to the next.
Photoshop automatically creates the blitheness in between the keyframes.
Layer Types
Now that we have a good idea of how the animation process works in Photoshop, allow's take a closer wait at the common layer types that tin can be animated. Because dissimilar layer types have different properties to breathing, pay attention to which layer types are being used.
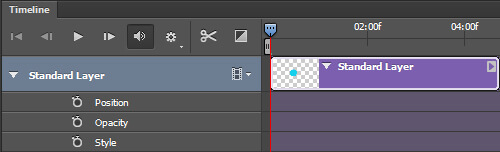
The standard (pixel) layer is a layer that contains pixel information. This is the most common (and nearly basic) layer in Photoshop. Layer properties include:
- position,
- opacity,
- styles.
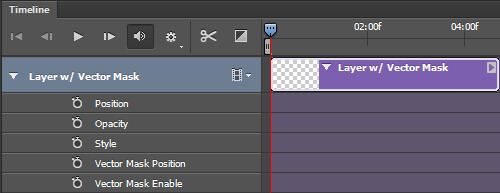
Calculation a layer mask or vector mask to any layer will introduce boosted properties specific to that mask. Layer properties that are added to the layer's existing properties include:
- layer or vector mask position
- layer or vector mask enabling

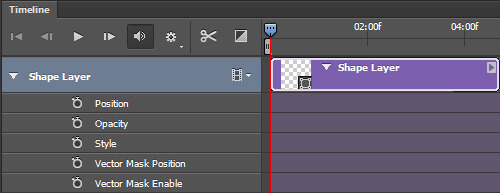
A shape layer contains a shape (whether from i of the shape tools or the Pen tool) or a line segment. Considering shapes and line segments are built with vector mask information, those mask backdrop will appear in add-on to the other layer properties. Layer properties include:
- position,
- opacity,
- styles,
- vector mask position,
- vector mask enabling.
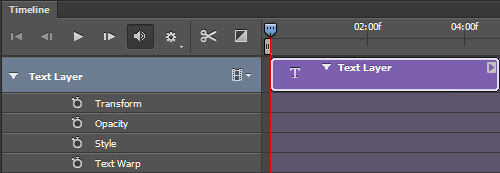
A text layer contains editable text. If text has been rasterized, and then the layer will no longer be a text layer, but rather will be a standard layer with pixel information. Layer properties include:
- transform,
- opacity,
- styles,
- text warp.
A smart object can contain any ane or combination of the to a higher place layer types. A smart object acts like a wrapper for any layer, preserving the original layer while using a new prepare of properties. These properties include:
- transform,
- opacity,
- styles.
A word of alarm when using smart objects. Because a smart object preserves the original quality of the layer or the set of layers it contains, it tin be scaled and rescaled without losing quality. However, it cannot be scaled any larger than the size of the original layer it contains. Doing so would cause the smart object to lose quality.
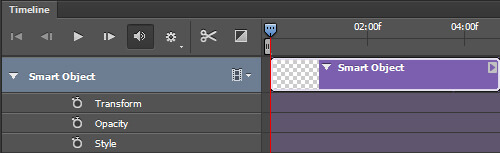
At this point, I want to mention two other layer types — a video layer and a 3D layer. Both of these layers are completely unique from the other layer types mentioned. The video layer is actually a layer grouping that contains its own set of properties, while the 3D layer — besides containing a unique set of properties — is manipulated in an environment entirely carve up from the other layers, adding to the level of complication. Due to the uniqueness of these two layer types, I volition not get into particular hither. You tin can run into how both layers are represented in the timeline below:

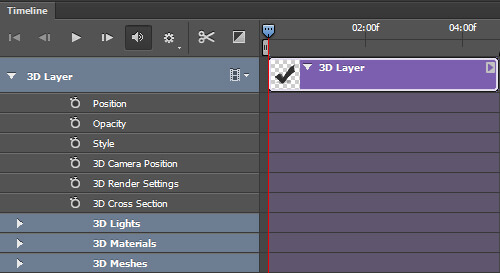
I encourage you to explore these 2 layer types on your own. For the remainder of this article, I volition be focusing merely on the traditional layer types, excluding video and 3D.
Layer Properties
Now that we have a grasp of the dissimilar layer types, let'south examine the different properties that we are able to animate. Knowing how each property works is important to understanding their limitations and how to get around them. Allow's look at the common animation properties.
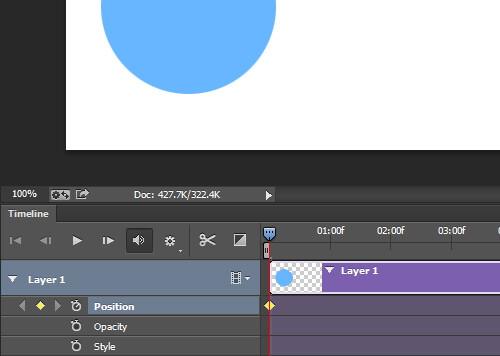
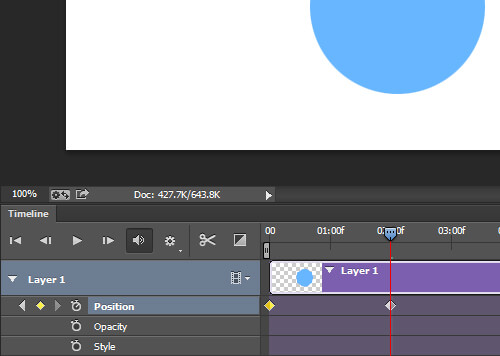
The Position property allows for motility along the X- and Y-axis. Manipulate the position of an object by using the Move Tool.
The object'due south Position holding was keyframed to move the ball back and along along the 10 axis.
Opacity allows you to keyframe the opacity of a layer. The Opacity control tin be found in the Layers panel.
The object'due south opacity was keyframed at 100% and 0% to create a fading animation.
The Style property allows you to keyframe the layer styles of a layer. Access the layer styles by double-clicking a layer in the Layers console.
The object's layer styles (Bevel & Emboss, Color Overlay, and Drop Shadow) were all keyframed to create a pulsing animation.
The layer mask or vector mask position keyframes the x and y positions of each mask. It works best when the mask is not linked to the layer.
The mask'due south position is keyframed to scrub beyond the layer, revealing the background layer.
Enabling or disabling a layer or vector mask is also possible. To enable or disable a layer mask, go to "Layer" → "Layer Mask" and select either "Enable" or "Disable." For vector masks, get to "Layer" → "Vector Mask." Alternatively, you can "Shift + Click" the mask in the Layers console to toggle on or off.
The mask is keyframed to exist enabled, then disabled later on a short time, causing a reveal.
Specific to text layers, the Text Warp belongings allows you lot to keyframe any text warp applied to a text layer. You can access a list of text warp effects past going to "Type" → "Warp Text."
A Flag warp was applied to the text and keyframed to create a warping blitheness.
The Transform property allows y'all to keyframe transformation to a layer. Various transformations (such as Rotate and Calibration) can be accessed past going to "Edit" → "Transform," or by pressing Control + T to enter Free Transform manner.
The object's Calibration and Rotation are keyframed to create a spinning star that grows and shrinks.
Learning Some New Techniques
In this side by side section, we volition combine what we learned in a higher place to explore some new animation techniques. We'll besides explore how to manipulate animations with adjustment layers and filters, how to create complex motion past layering animations, and even how to create organic-looking effects.
Using Template Layers With Smart Object Animations
Considering smart objects can contain multiple layers, we can create temporary layers that act every bit templates to help us create more complex animations. For case, in the animation beneath, I've created a ruddy dot that moves effectually in a circle. Typically, this would be difficult to create, requiring many keyframes. With smart objects, nosotros can utilise template layers to simplify the procedure. Let'southward see how information technology's done:
A cherry-red dot moving around in a circle.
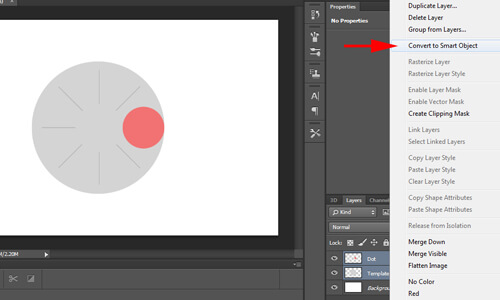
In the scene below, I take created two layers: one with a carmine dot, labeled "Dot," and the other with a large greyness circle, labeled "Template Shape." I've added hash marks to the big grey circumvolve to better demonstrate motility.

To kickoff, I'll select both layers and convert them to a smart object. This can be done past right-clicking i of the selected layers and choosing "Convert to Smart Object" from the pop-up list.
Now, we can breathing both objects every bit a unmarried layer. Because this is a smart object, I take access to the Transform holding in the Timeline panel, which allows me to keyframe rotation. I've added a keyframe at each half rotation, for one full rotation. The upshot is the circumvolve, rotating 360 degrees.
Step 3: Both layers rotate as one.
At present that our animation is working, we'll need to remove the template shape. To exercise this, double-click to edit the smart object's thumbnail in the Layers panel. Once the smart object is open, we can hibernate the "Template Shape" layer.
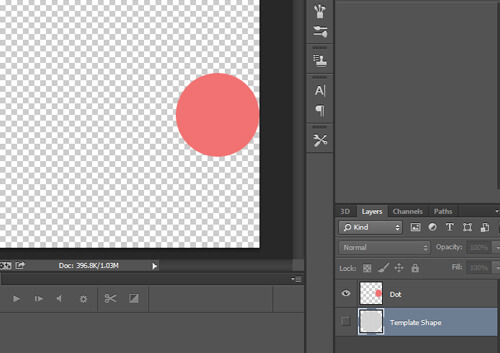
All nosotros demand to do at present is save the smart object document and render to our original certificate. We can encounter that our red dot moves effectually in a circle without the gray shape in the groundwork.
A red dot moving effectually in a circle.
Embedding Animations in Smart Objects
Every bit I mentioned, smart objects can consist of any type (or multiple types) of layers — including layers that already comprise keyframed animation. A smart object'southward ability to concur animated layers makes information technology even easier to create complicated movements, such as the ane below. Let'southward explore how this is done.
A bouncing dot animation created with multiple sets of keyframes.
In the scene below, I have already set up a simple animation of a yellow dot rotating on a blue background.
Footstep 1: A yellowish dot rotating on the canvas.
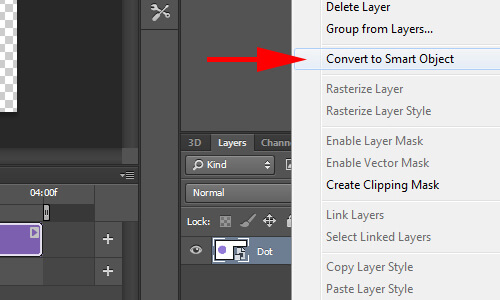
Next, I'll go to the Layers console, right-click the "Dot" layer, and select "Convert to Smart Object."
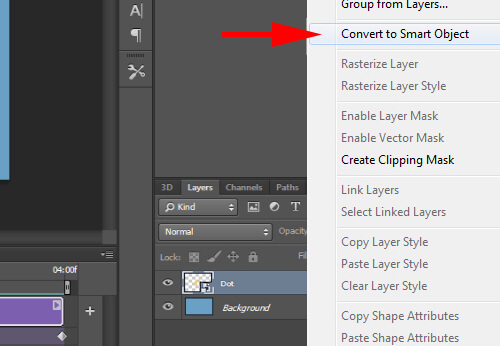
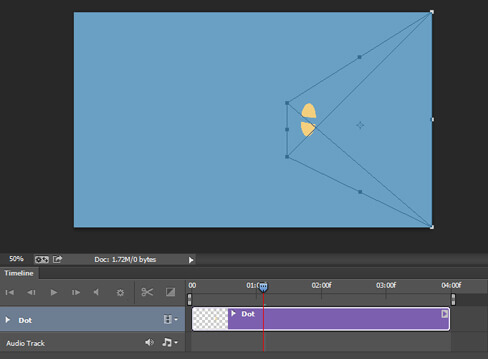
Now that this is a new smart object layer, we tin can add a new set of keyframes to information technology. In the scene below, I've added a set of keyframes to animate the smart object up and down. When the animation is played back, we can see both sets of keyframes at work, creating a bouncing consequence.
Footstep 3: New keyframes create a bouncing issue.
Let's take this a little further. Convert this smart object layer into another smart object. This will requite us a brand new smart object to edit. Adjacent, we'll add together a transformation to this smart object. Get to "Edit" → "Free Transform," and suit the handles so that the smart object appears in perspective.
Now, when you play dorsum the animation, it will animate inside the distorted smart object.
Animation plays within the transformation.
Animating Filters
Now that nosotros've learned how to embed animations inside smart objects, we tin can use this same technique to breathing filters. If nosotros add a filter to a smart object that contains an animated layer, the result will be an animation that plays through the filter. Let's see how this works.
In the scene beneath, I have already ready a simple blitheness inside of a smart object that shows a dot moving over a cherry-red background.
Step 1: Smart object animation of a yellow dot moving across a cherry-red background.
Because our animation already resides in a smart object, I tin add a filter direct to it. In this example, I'll go to "Filter" → "Distort" → "Twirl."
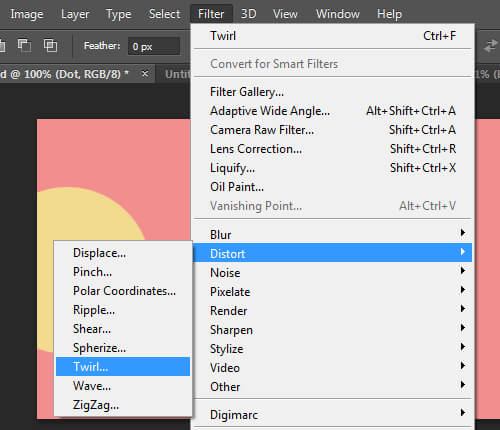
When I preview the blitheness, I run into some interesting things happening. The filter has been applied to the smart object itself, rather than pixels of its contents. Therefore, the motion of the animated pixels through the filter has a unique effect.
Animation of the Twirl filter.
Adding Layer Styles to Smart Object Animations
Layer styles can be applied to animated layers much like regular layers. They are as well useful in other ways. I'll testify you what I mean.
In the scene below, I already take a smart object that contains a simple blitheness of a dot moving across a white groundwork.
Pace i: Simple smart object animation.
My goal is to apply the Bevel & Emboss layer syle to the dot. Notwithstanding, If I endeavor to apply the layer fashion to the smart object at this signal, information technology would affect the entire smart object, white background and all.
Step 2: Layer styles are practical to the paradigm equally a whole.
To gear up this, I need to remove the white background. Earlier, I mentioned that we could edit the smart object to hide extra layers. In this example, I want to demonstrate another method.
As long as there is adept tonal contrast between the layers, nosotros can use the Alloy If options in the Layer Styles panel to remove the background. Double-click the smart object layer to open the Layer Styles panel, and arrange the "Blend If" → "This Layer" slider until the background disappears.
Tip: Holding down Pick volition separate the sliders, causing a smoother transition.

To stop this method, correct-click the layer in the Layers console and select "Convert to Smart Object." This volition create a new smart object that preserves the changes we've just made.
Now, when we add a fix of layer styles to our animation, the effect will be practical just to the object.
Layer styles have been added to the smart object animation.
Changing an Animation With Adjustment Layers
Adjustment layers human action the same style with animated layers as they practice with regular layers. As long every bit an adjustment layer is above the layer that contains the animated keyframes, the animation will inherit the adjustments. With this in heed, we tin apply adjustment layers to create some truly unique effects. Let'southward explore this.
In the scene below, I have set upwardly a uncomplicated grayscsale animation with two dots, one passing over the other.
Step 1: Grayscale blitheness of two dots.
Because the unabridged scene has been created in shades of greyness, I volition employ the Gradient Map Adjustment layer to innovate colour. Once I've added the aligning layer, I can employ the Properties console to make the following adjustments.
The resulting outcome is an animation that has been colored based on the properties of the adjustment layer.
Blitheness has been colored by the adjustment layer.
Creating Organic Furnishings With Aligning Layers
At present that we've learned several techniques to create animations, I desire to combine a few of these to create the organic effect seen below.
Organic animation effect.
Let's learn how this is done. To start, I've created another simple animation with 2 layers, one passing over the other. The merely difference is that both layers take been blurred.
Step i: Blurry dot animated over another.
Now, we'll add the Levels Adjustment layer. Utilize the Backdrop console to bring in the shadows and highlights sliders until the edges of the objects are well-baked.
Playing dorsum the animation will give united states a unique organic effect.
Organic blitheness result.
Putting Everything Together
Now that we've learned the concepts behind more complex animations, information technology's fourth dimension to put them into practice. In this next section, we'll explore iii advanced animations and how to create them.
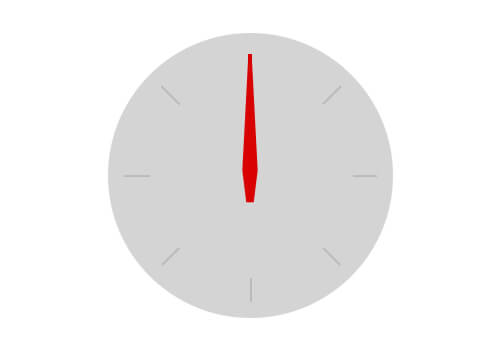
Create a Clock With Moving Easily
In this tutorial, we will exist using the template layer technique to breathing the spinning hands of the clock. We will also use layer styles with the animated elements to add depth to the objects in our scene. This is what we'll be creating:
Animation of the easily of a clock.
The scene starts with 2 new layers: One contains the shape of a minute hand (in reddish), and the other is our template object (in gray).
Just as we learned before, we will catechumen these two layers into a smart object and animate the rotation.
Step two: Layers combined as a smart object are animated as one.
To lock the animation, convert the layers into another smart object. This will let us to transfrom (Control + T) the smart object so that it appears to be in perspective, as seen in the image beneath.
Pace 3: Animation is transformed into perspective.
Next, we need to go back into the original smart object and hide the template layer. When we save and return to our working certificate, we should run into our minute hand rotate without the template layer.
Step four: Blitheness with template layer hidden.
Calculation the Drop Shadow layer style with a "Spread" setting of 100% volition simulate some depth.
Step five: Drib Shadow simulates the edges of the clock hand.
Repeating these steps, we can create the hour hand. (I've readjusted the timing to fit in the animation of the hr manus.)
Step vi: 60 minutes and minute hand animating.
Lastly, we can create the residual of the clock using traditional Photoshop techniques. The event is a clock that animates in perspective.
Blitheness of the easily of a clock.
In this tutorial, nosotros've learned how to utilise template layers to create more than complicated movements. Nosotros've also learned how to use transformations and layer styles to create the illusion of perspective in our blitheness.
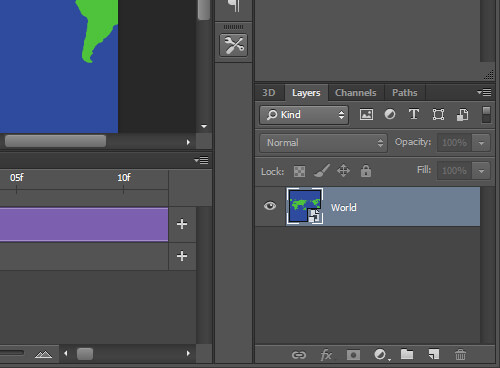
Create a Revolving Earth
In this tutorial, we will apply filters to animated smart objects in order to create a new consequence. This is what nosotros'll be creating:
Blitheness of a revolving globe.
Below is the base image we'll be using. Observe that it repeats itself. This is important considering it will help united states to create a looping animation in the next step.
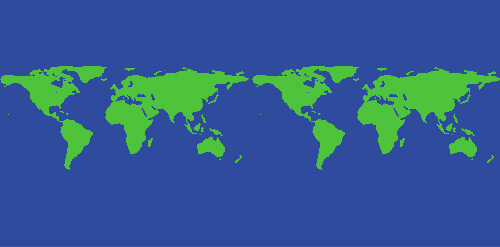
I've created a new square document and added the graphic of the earth map as a new layer. I've gone ahead and animated the Position belongings so that the world map scrolls across the scene. Information technology's been timed to loop when it starts over.
Stride 2: Elementary looping animation.
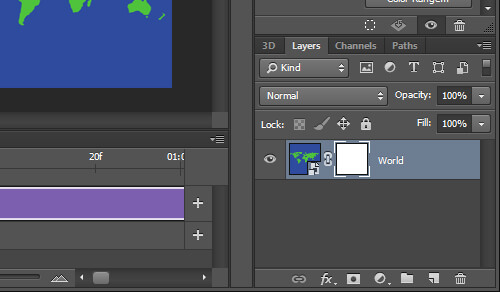
Next, convert this layer into a smart object.
Before we do anything else, I want to testify y'all what'due south going on with the layer. If I go to "View" → "Show" → "Layers Edges," nosotros tin can see the bounding box of the layer as it animates. This will be important when nosotros add together filters. Besides, notice that our animation loop seamlessly.
Step iv: Layer boundaries visible during animation.
At this point, our scene is still not set for united states to add a filter. But let'southward take a moment to explore why — we'll add the Spherize filter to see what happens. When the filter is added, nosotros can come across that information technology's non being applied inside the confines of our canvas; rather, it's beingness practical straight to the whole layer. The outcome is a distorted map that moves through the sail. Likewise, notice how this disrupts the looping that we saw in the previous step. This is not the effect we are later.
Step 5: Filter applied to the layer boundaries.
We at present know that we have a little more than work to practise in lodge for the filter to be applied correctly. To make sure that the filter applies only to the boundaries of the canvas, nosotros demand to create a layer mask. First, go to "Select" → "All" to select the unabridged canvas. Side by side, click the "Add Layer Mask" icon in the Layers panel. We should now have a layer mask applied to our layer.
Convert this layer to a new smart object. Our resulting smart object layer will now animate within the boundaries of the canvas. If we add the Spherize filter once again, nosotros can run across that it's being applied correctly when we play the animation. Go ahead and add together the Spherize filter a second time to increment its issue.
Footstep seven: Filter applied to the boundaries of the canvas.
Now that our event is working properly, we can create some other layer mask in the shape of a circle to hibernate unwanted pixels.
Step 8: Layer Mask hides everything outside of the globe shape.
To finish, you can at present add layer styles direct to the smart object animation for embellishments.
Animation of a revolving earth.
In this tutorial, we've learned how to use smart objects to incorporate animated layers, to which we so add effects, such every bit filters, layer masks and layer styles. Hopefully, this tutorial has shown y'all how easy it is to create complicated furnishings using animated layers in Photoshop.
Create a Flame Animation
In this tutorial, we'll employ multiple adjustment Layers and filters, with smart object animations, to create a truly unique flame event. This is what our final animation will look like.
Flame animation using the organic technique.
To begin, nosotros'll need to create an extremely alpine scene. In this case, I have a scene that's approximately 500 × 10,000 pixels. On a new layer, I've drawn a very rough line using the Brush tool.
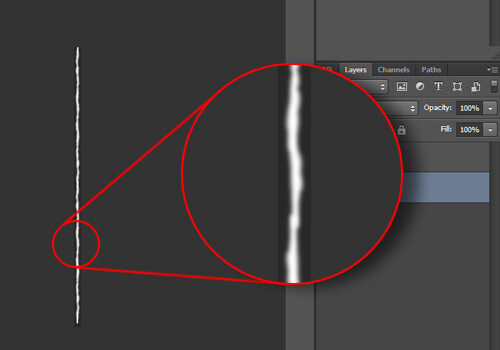
Next, create a new scene sized to 500 × 500 pixels, with a blackness background. Bring the tall line that we just created into this new scene, and create a simple scrolling animation.
Pace two: Simple animation of scrolling line.
Add a new layer mask in the shape of an upside-down teardrop to the blithe layer. Make sure that the mask has soft edges. The result volition reveal a portion of the line as it animates through the mask.

Play back the animation to see the flame have shape. Notice how the shape of our mask is causing the height of the animation to spring effectually while the base generally stays in the same spot.
Step 4: Simple animation with a layer mask.
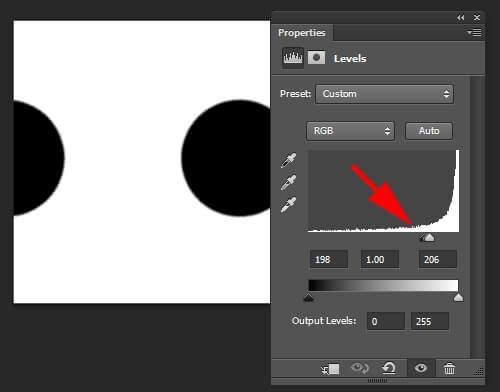
Side by side, add the Levels Adjustment layer. In the Properties panel, move the 2 outside sliders inward until the edges of the flame are crisp. Playing dorsum the animation will show us a smoother flame.
Step 5: Adjustment layer refines the shape.
At this point, we can farther smooth out the flame. Outset, catechumen all layers to another smart object. Then, blur the layer, followed past a repeat of the Levels Aligning layer.
Step 6: Blurring the smart object and then repeating the Levels Adjustment layer creates a more than fluid looking motion.
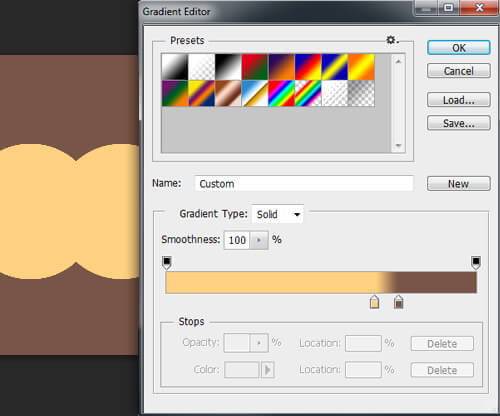
There are several means to introduce color. I want to bear witness i manner that has worked well for me. Create a new layer, and use the Brush tool to paint blue (on the base) and yellow (towards the pinnacle) highlights on the flame. Irresolute this layer'due south blending mode to "Hard Mix" volition requite us some vibrant bands of color.
Step seven: Using alloy modes to add color.
Considering the transitions between colors are too harsh, nosotros'll need to soften them. To do this, select all layers once again (Alt + Control + A) and convert to another smart object. We tin now add the Motion Blur filter to blend the colors better.
Pace 8: Adding Motion Blur blends the colors.
Almost done! Because this object is a smart object, we can treat it similar a normal layer and employ simple photo limerick techniques to add it to another photo. The final epitome shows our flame dancing on a lighter.
Flame blitheness using the organic technique.
In this tutorial, nosotros've learned how to make apply of multiple adjustment layers and smart filters by layering smart objects within smart objects to create and refine an organic consequence within Photoshop.
Photoshop Animation Conclusion
By now, you should be familiar with all of the common layer types and how each of their properties can exist animated. Too, we now know that Photoshop is well equipped to produce some amazing animations. We've explored how to use smart objects to extend the animation capabilities by interim as templates or enabling u.s.a. to stack multiple animations. We've also seen how to enhance our animations with filters and layer styles. Nosotros've even learned how to create some new — and seemingly incommunicable furnishings (for Photoshop) — past leveraging the Levels Adjustment layer. Lastly, we've put everything together to create some polished animations.
The techniques presented in this article demonstrate how Photoshop can exist a reliable tool for creating animations. There volition always be applications out there that are dedicated to creating animation. However, owning — or even learning — other software isn't always feasible. Instead, y'all can stay within a program you are comfortable with and nonetheless create furnishings that were once deemed incommunicable in Photoshop.
Boosted Reading
- Texture Trickster, Stephen Petrany Additional animation tutorials and tricks on my weblog
- Animation in Adobe Photoshop, Tuts+ A tutorial series on animation
![]() (ml, al)
(ml, al)
Source: https://www.smashingmagazine.com/2015/06/creating-advanced-animations-in-photoshop/
Posted by: zamudiofolisn1984.blogspot.com
0 Response to "How Do You Make A Stop Motion Animation Look More Smooth Fluid Photoshop"
Post a Comment